Note: Because I believe this content is valuable to the broader community, I am posting it in English in addition to Japanese so that it can reach a wider audience.
Introduction
In the field of IoT and robotics, there is a rapidly growing need to "faithfully reproduce and analyze real-world states in the cloud." This article provides a beginner-friendly walkthrough for building a "cloud-connected digital twin" that collects positional data from a ROS2-based robot in real time using Microsoft Fabric's Real-Time Intelligence (RTI), stores it long-term in OneLake, and visualizes it in real time with a Real-Time Dashboard.
Agenda
This article is structured as follows:
- System Overview — Understanding the architecture
- Step 1: Preparing the Fabric Workspace — Setting up the work environment
- Step 2: Converting ROS2 to MQTT — Configuring data transmission on the robot side
- Step 3: Receiving MQTT in the RTI EventStream — Configuring the cloud-side receiver
- Step 4: Storing Data in Eventhouse and KQL Database — Building the real-time DB
- Step 5: Long-Term Storage in OneLake — Storing in and referencing from the data lake
- Step 6: Real-Time Visualization with the Real-Time Dashboard — Live display
System Overview
[ROS2 Robot]
     │ MQTT conversion (ros2_mqtt_bridge, etc.)
     ▼
[Internet]
     │ MQTT over TLS
     ▼
[Microsoft Fabric RTI]
 ├─ EventStream (ingest)
 ├─ Eventhouse / KQL Database (storage)
 ├─ OneLake (long-term retention)
 └─ Real-Time Dashboard (visualization)
|
Step 1: Preparing the Microsoft Fabric Workspace
First, prepare a Microsoft Fabric tenant and workspace.
- Sign in to the Microsoft Fabric portal
- From the left menu, create a workspace via "Workspaces" → "New workspace"
- Assign a Fabric capacity (F SKU) or trial license
All subsequent resources (EventStream, Eventhouse, OneLake, etc.) will be managed inside this workspace.
Official documentation:
Step 2: Configuring MQTT Conversion on the ROS2 Robot
Convert ROS2 topic data into MQTT and send it to the cloud.
2-1. Installing the MQTT Bridge
# Example using ros2_mqtt_bridge
pip install paho-mqtt

# Or an OSS bridge
git clone https://github.com/yourusername/ros2_mqtt_bridge
2-2. Defining the Data to Send
| ROS2 Topic | Description | Example MQTT Topic |
|---|---|---|
/robot/pose |
Position / orientation (geometry_msgs/Pose) | robot/001/pose |
2-3. Example MQTT Publisher Script
import rclpy
from rclpy.node import Node
import paho.mqtt.client as mqtt
from paho.mqtt.packettypes import PacketTypes
from paho.mqtt.properties import Properties
import json
from geometry_msgs.msg import PoseStamped

class MQTTBridgeNode(Node):
    def __init__(self):
        super().__init__('mqtt_bridge')
        # Use MQTTv5 (required for session control via Properties and Content-Type)
        self.client = mqtt.Client(
            mqtt.CallbackAPIVersion.VERSION2,
            protocol=mqtt.MQTTv5,
        )
        self.client.tls_set()  # Enable TLS

        # Discard the session immediately on disconnect to avoid session exhaustion
        connect_props = Properties(PacketTypes.CONNECT)
        connect_props.SessionExpiryInterval = 0

        self.client.connect(
            "YOUR_EVENT_GRID_MQTT_ENDPOINT", 8883,
            clean_start=True, properties=connect_props,
        )
        self.client.loop_start()  # Run network processing on a background thread

        self.pose_sub = self.create_subscription(
            PoseStamped, '/robot/pose', self.pose_callback, 10)

    def pose_callback(self, msg):
        payload = {
            "robot_id": "robot_001",
            "timestamp": self.get_clock().now().to_msg().sec,
            "x": msg.pose.position.x,
            "y": msg.pose.position.y,
            "z": msg.pose.position.z
        }
        # By setting Content-Type to application/json,
        # Azure Event Grid routes the payload as `data` (JSON) instead of `data_base64`.
        pub_props = Properties(PacketTypes.PUBLISH)
        pub_props.ContentType = "application/json"
        self.client.publish("robot/001/pose", json.dumps(payload), properties=pub_props)
Official documentation:
Step 3: Receiving MQTT Data in the RTI EventStream
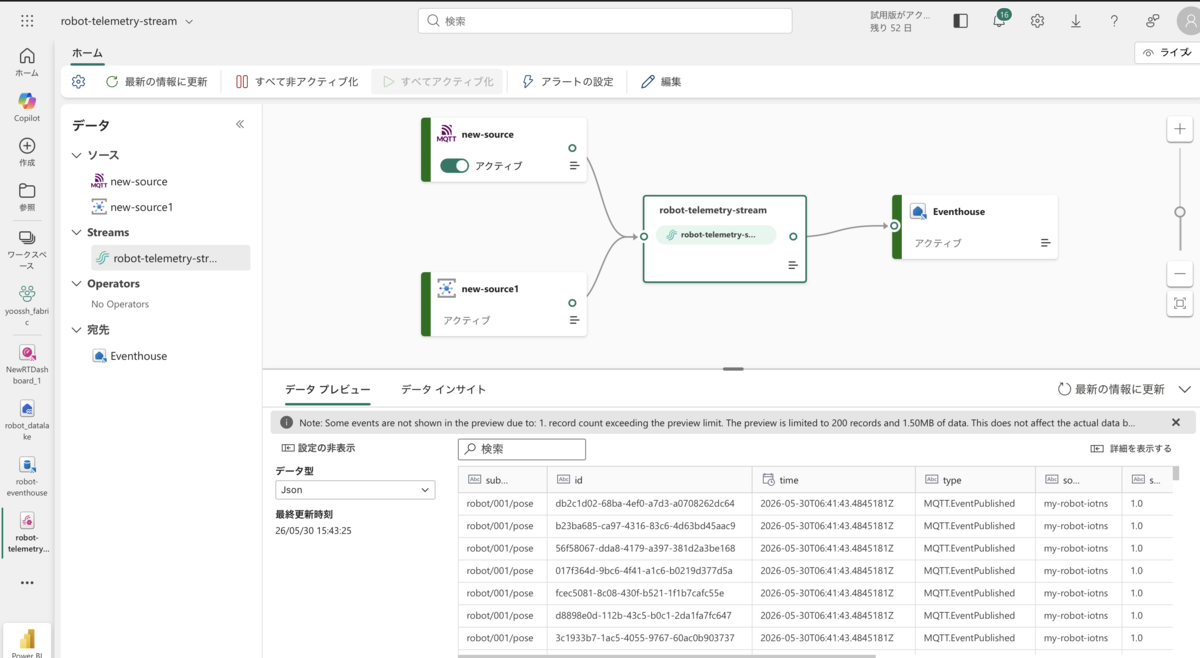
Use Microsoft Fabric's Real-Time Intelligence (RTI) EventStream to receive MQTT data from the robot.
3-1. Creating an EventStream
- In the Fabric workspace, choose "+ New item" → "EventStream"
- Give the EventStream a name (e.g.,
robot-telemetry-stream) and create it
3-2. Adding the MQTT Source
There are two ways to connect from EventStream to Azure Event Grid:
| Option A: MQTT connector | Option B: Azure Event Grid connector (recommended) | |
|---|---|---|
| Authentication | Client certificate (via Azure Key Vault) | Managed identity (no certificate required) |
| Setup complexity | High (Key Vault preparation required) | Low (just pick a subscription) |
| Supported brokers | Any MQTT broker | Azure Event Grid only |
Option A: MQTT Connector
⚠️ Note for trial (evaluation) tier users
The trial Namespace of Azure Event Grid has a low limit on concurrent MQTT connections (default: 1 connection per authentication name). Repeated connect/disconnect cycles cause sessions to accumulate and may result inQuota exceedederrors. If this happens, raise the limit with the following Azure CLI command:az eventgrid namespace update \ --name my-robot-iotns \ --resource-group MyResource01 \ --topic-spaces-configuration maximumClientSessionsPerAuthenticationName=3Alternatively, wait 30 minutes to 1 hour for sessions to expire naturally, confirm
MQTT: Connectionshas returned to 0 in Azure Portal → Event Grid namespace → "Monitoring" → "Metrics", and then retry. The production Standard tier supports up to 10,000 concurrent connections, so this limit is normally not a concern.
Because Azure Event Grid uses X.509 client certificate authentication, you must upload the EventStream-side client certificate (the .pem and .key generated in Appendix A-3) to Azure Key Vault beforehand.
Prerequisite: Uploading the certificate to Azure Key Vault
The following steps use the Azure CLI. There are two execution environments:
| Environment | Description |
|---|---|
| Azure Cloud Shell (recommended) | Launch from the ">_" icon at the top of the Azure Portal. No installation; runs in the browser. |
| Local PC (macOS) | Install with brew update && brew install azure-cli, then sign in with az login |
Official documentation:
If Azure Key Vault has not been created yet, create it as follows. Before creating Key Vault, you need to register the resource provider in your subscription.
# Register the Microsoft.KeyVault resource provider
az provider register --namespace Microsoft.KeyVault

# Confirm registration is complete (takes 1-2 minutes to reach "Registered")
az provider show --namespace Microsoft.KeyVault --query registrationState
Once it shows "Registered", create the Key Vault.
# Create the Key Vault (skip if it already exists)
az keyvault create --name robot-key-001 --resource-group MyResource01 --location japanwest
The certificate uploaded to Azure Key Vault must be in PEM bundle format with the certificate and private key combined into a single file. The private key also needs to be converted to PKCS#8 format (BEGIN PRIVATE KEY), which Azure Key Vault requires.
# Move to /tmp/mqtt-cert-test (the A-3 working directory)
cd /tmp/mqtt-cert-test

# Convert the private key to PKCS#8 format
openssl pkcs8 -topk8 -nocrypt \
  -in robot-001-authn-ID.key \
  -out robot-001-authn-ID-pkcs8.key

# Create the PEM bundle (concatenate certificate + PKCS#8 private key)
cat robot-001-authn-ID.pem robot-001-authn-ID-pkcs8.key > robot-001-authn-ID-bundle.pem
Next, create the import policy file. To match an RSA 2048 certificate generated with --kty RSA --size 2048, set keyType to "RSA" and keySize to 2048.
{
  "secretProperties": {
    "contentType": "application/x-pem-file"
  },
  "keyProperties": {
    "exportable": true,
    "keyType": "RSA",
    "keySize": 2048,
    "reuseKey": false
  },
  "issuerParameters": {
    "name": "Unknown"
  }
}
Save the above as keyvault-cert-policy.json and import via the Azure CLI.
# Run from the project directory (where keyvault-cert-policy.json lives)
az keyvault certificate import \
  --vault-name robot-key-001 \
  --name robot-001-client-cert \
  --file /tmp/mqtt-cert-test/robot-001-authn-ID-bundle.pem \
  --policy @keyvault-cert-policy.json
Note: The user configuring the EventStream connection needs the "Key Vault Certificate User" or "Key Vault Administrator" role on the Key Vault. Assign the role from Azure Portal → Key Vault → "Access control (IAM)".
Adding the MQTT source to EventStream
- On the EventStream canvas, choose "Add source" → "Connect data sources" → "New (+)" → "MQTT" → "Connect"
- Select "New connection"
- Fill in the connection settings:
- MQTT Broker URL:
ssl://(e.g.,:8883 ssl://my-robot-iotns.japanwest-1.ts.eventgrid.azure.net:8883) - Connection name: any
- Username: the "Client Authentication Name" registered in A-4 (e.g.,
robot-001-authn-ID) - Password: leave blank
- Select [Connect]
- MQTT Broker URL:
- Fill in the MQTT data source configuration:
- Topic name:
robot/001/pose - Version: choose V5 (or V3)
- Topic name:
- Expanding "TLS/mTLS settings" shows two toggles:
- "Trust CA certificate": enable when specifying a CA certificate to validate the broker's server certificate (not needed here)
- "Client certificate and key": enable and specify the certificate stored in Azure Key Vault (
robot-001-client-cert)
Option B: Azure Event Grid Connector (recommended)
Authenticates via managed identity; no certificate management required. The following preparation is needed:
Prerequisites:
- Azure Portal → Event Grid namespace → left menu "Settings" → "Identity" → switch the system-assigned identity to "On" and click "Save"
- In the Fabric portal, click the Settings (gear icon) in the top right → in the side panel under "Governance and insights" select "Admin portal" → choose "Tenant settings" → in the "Developer settings" section enable "Service principals can use Fabric APIs"
- Open the Fabric workspace page, on the command bar select "Manage access" → "+ Add people or groups" → in the search box enter the Event Grid namespace name (e.g.,
my-robot-iotns), select the displayed "my-robot-iotns" and click "Add" → set the role to "Contributor"
Adding to EventStream:
- On the EventStream canvas, choose "Add source" → "Connect data sources" → "New (+)" → "Azure Event Grid Namespace" → "Connect"
- Fill in the connection settings:
- Subscription: the Azure subscription that contains the Event Grid namespace
- Namespace name:
my-robot-iotns
- If MQTT is enabled and no routing is configured, pick the topic to use under "Namespace topic"
- Select "Next" → "Connect" → "Add"
Official documentation:
Step 4: Storing Data in Eventhouse and KQL Database
Store received data in an Eventhouse (KQL Database) that supports real-time search and analytics.
4-1. Creating the Eventhouse
- In the workspace, create an "+ New item" → "Eventhouse" (example name:
robot-eventhouse) - Click "Create" — a KQL database named
robot-eventhouseis automatically created at the same time
4-2. Creating the KQL Table
- Open the
robot-eventhouseyou just created - In the object tree on the left, select
robot-eventhouse_querysetto open the query editor - Paste the following into the editor and click "▶ Run"
// Pose table
.create table RobotPose (
    robot_id: string,
    timestamp: datetime,
    x: real,
    y: real,
    z: real
)
4-3. Adding the Eventhouse as an EventStream Destination and Publishing
- Open the
robot-telemetry-streamEventStream, and from the output of therobot-telemetry-streamnode choose "Add destination" → "Eventhouse" - Choose a data ingestion mode:
| Mode | Behavior |
|---|---|
| Direct ingestion (recommended) | Loads data into Eventhouse with no transformation |
| Event processing before ingestion (default) | Applies filters / aggregations before loading |
Since no transformation is needed here, choose "Direct ingestion".
- Enter the following and click "Save":
- Destination name: any (e.g.,
robot-eventhouse-dest) - Workspace: the workspace you are using
- Eventhouse:
robot-eventhouse - KQL database:
robot-eventhouse - Table:
RobotPose(created in Step 4-2)
- Destination name: any (e.g.,
- Click the "Publish" button to activate the EventStream
4-4. Configuring the KQL Ingestion Mapping
After publishing the EventStream, configure the KQL ingestion mapping. This defines which fields in the incoming JSON map to which columns of the KQL table.
Why it's needed: Azure Event Grid wraps MQTT payloads in CloudEvents format for delivery, so the actual data lives under the data field rather than at the top level.
{
  "datacontenttype": "application/json",
  "data": { "robot_id": "robot_001", "x": 135.507, "y": 34.693, ... },
  "subject": "robot/001/pose",
  ...
}
To populate KQL columns (robot_id, x, etc.) correctly, you must specify paths under the data field such as $.data.robot_id and $.data.x.
Run the following as a single line in the robot-eventhouse_queryset query editor.
.create-or-alter table RobotPose ingestion json mapping 'RobotPose_mapping' '[{"column":"robot_id","path":"$.data.robot_id","datatype":"string"},{"column":"timestamp","path":"$.data.timestamp","datatype":"datetime","transform":"DateTimeFromUnixSeconds"},{"column":"x","path":"$.data.x","datatype":"real"},{"column":"y","path":"$.data.y","datatype":"real"},{"column":"z","path":"$.data.z","datatype":"real"}]'
Tip:
"transform":"DateTimeFromUnixSeconds"automatically converts the Unix epoch seconds integer sent by the bridge script into adatetimevalue.
When you need to re-run this command:
This mapping only needs to be set up once — it then applies automatically to all subsequent data. You only need to re-run (or recreate) it in the following cases:
- When the JSON field structure sent by the bridge script changes (add/remove/rename fields)
- When the KQL table schema (column definitions) changes
- Because
.create-or-alteroverwrites the existing mapping, schema changes are handled by editing the same command and re-running it.
4-5. Running the Bridge Script (sending test data)
Once the EventStream is published and the mapping is configured, simulate data from the robot. Open two terminals and run the following.
Terminal 1: Start the pose simulator
Make sure a local MQTT broker (Mosquitto) is running.
# macOS
brew services start mosquitto

# Ubuntu
sudo systemctl start mosquitto
python3 ros2_pose_simulator.py
Terminal 2: Start the MQTT bridge
# Move to /tmp/mqtt-cert-test (the A-3 working directory)
cd /tmp/mqtt-cert-test

python3 /path/to/ros2_mqtt_bridge.py \
  --fabric-host my-robot-iotns.japanwest-1.ts.eventgrid.azure.net \
  --username robot-001-authn-ID \
  --cert-file robot-001-authn-ID.pem \
  --key-file robot-001-authn-ID.key
If you see [Fabric connection successful], the connection to Azure Event Grid is established.
4-6. Verifying Operation
EventStream live preview
- Open
robot-telemetry-streamin the Fabric portal - Select the MQTT source node on the canvas and click "Data preview"
- While the bridge script is running, incoming messages should appear in real time
Verifying ingestion via KQL query
- Open
robot-eventhousefrom the workspace - In the object tree on the left, select
robot-eventhouse_querysetto open the query editor - Paste the following query and click "▶ Run"
RobotPose
| where timestamp > ago(5m)
| order by timestamp desc
| take 10
If results come back, the entire EventStream → Eventhouse pipeline is working correctly.
Official documentation:
Step 5: Long-Term Storage in OneLake
Historical pose data is saved in Fabric's unified data lake OneLake for long-term management.
5-1. Using a OneLake Shortcut or Lakehouse
- In the workspace, create "+ New item" → "Lakehouse" (e.g.,
robot_datalake)- Leave "Lakehouse schema" at its default (checked) on the creation screen and click "Create"
- Enable the Eventhouse's "OneLake" "Availability":
- From the workspace, open
robot-eventhouse - Select the "Database" tab at the top
- In the left tree, select the
robot-eventhousedatabase - In the "Database details" panel on the right, in the "OneLake" section, switch the "Availability" toggle to "Enabled"
- Once the toggle is "Enabled", KQL data starts syncing to OneLake in Delta Parquet format
- From the workspace, open
⏱️ Waiting for sync to complete
In the "Database details" panel, the "OneLake" section displays a "Latency" estimate (e.g.,3 hours). Immediately after enabling, "Pending size" shows the volume of unsynced data, which becomes0 Bwhen the sync finishes. Run the next step (referencing data from a notebook) after the sync completes.
5-2. Reading the Pose Logs Synced to OneLake
When OneLake availability is enabled, data in the RobotPose table is continuously synchronized to OneLake in Delta Parquet format. You can read it from a Fabric Notebook (Spark environment) as follows.
# Read the pose logs from OneLake in a Fabric Notebook (Spark environment)
df = spark.read.format("delta").load(
    "abfss://robot_datalake@onelake.dfs.fabric.microsoft.com/Tables/RobotPose"
)
df.show()
Official documentation:
Step 6: Real-Time Visualization with the Real-Time Dashboard
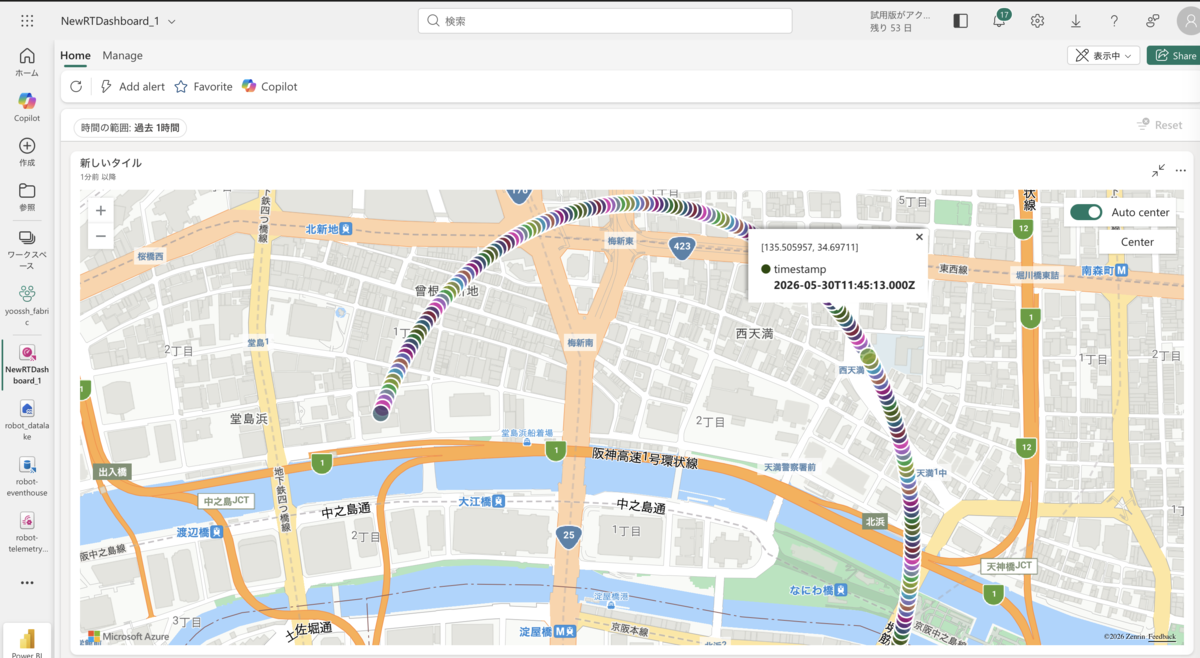
Use Microsoft Fabric's Real-Time Dashboard to visualize the robot's position in real time.
- In the Fabric workspace, select "+ New item" → "Real-Time Dashboard" to create a new dashboard (the default name
NewRTDashboard_1is fine) - Connect a KQL Database as the data source: "+ Add data source" → choose
robot-eventhouse→ click "Connect" - Choose "New tile" → "Map"
- In the "Query editor" at the bottom of the screen, paste the following query and click "Run"
// Query for real-time dashboard (trajectory over the past 5 minutes)
RobotPose
| where timestamp > ago(5m)
| where robot_id == "robot_001"
| project timestamp, x, y, z
| order by timestamp asc
- In the "Data" section of the left panel, choose "Define location by:" → "Latitude and longitude" and map the columns as follows:
- Latitude:
y (real) - Longitude:
x (real)
- Latitude:
- Click "Done" to save
Official documentation:
Appendix A: Configuring Azure Event Grid as an MQTT Broker
To connect an MQTT source to the EventStream in Step 3, you need an MQTT broker that both the robot (bridge script) and the Fabric EventStream can connect to. This appendix walks through using Azure Event Grid as the MQTT broker.
A-1. Creating an Event Grid Namespace
- Sign in to the Azure Portal and search for "Event Grid Namespaces"
- Click "+ Create"
- Enter the following, then click "Review + create" → "Create"
- Namespace name: a unique name (3-50 chars, alphanumeric and hyphens). This article uses
my-robot-iotns - Subscription / resource group: any
- Region: any
- Namespace name: a unique name (3-50 chars, alphanumeric and hyphens). This article uses
A-2. Enabling the MQTT Broker and Checking the Endpoint
- Open the overview page of the created namespace
- On the overview page, click the "Disabled" link next to "MQTT broker" (you'll be redirected to the "Configuration" page)
- On the "Configuration" page, select "Enable MQTT broker"
- Click "Apply" to save the setting
- Return to the namespace overview page and note the "MQTT hostname" displayed there
my-robot-iotns.japanwest-1.ts.eventgrid.azure.net  (port 8883)
|
Note: Once the MQTT broker has been enabled, it cannot be disabled.
A-3. Creating a Client Certificate
Azure Event Grid uses X.509 certificate-based client authentication. First install the Step CLI and generate a local CA and client certificate. The working directory for the certificate files is /tmp/mqtt-cert-test.
# Install Step CLI (macOS)
brew install step

# Create and switch to the working directory
mkdir -p /tmp/mqtt-cert-test && cd /tmp/mqtt-cert-test

# Initialize the CA (you'll be prompted for the CA private key password and the provisioner password)
# Note: The CA private key password set here is also needed by the subsequent certificate
#       generation command, so be sure to record it.
step ca init --deployment-type standalone --name MqttAppSamplesCA \
  --dns localhost --address 127.0.0.1:443 \
  --provisioner MqttAppSamplesCAProvisioner

# Generate the client certificate (you'll be prompted for the CA password set in A-3)
# Note: ~/.step/ is the home directory subpath where step ca init placed the CA certificate.
step certificate create robot-001-authn-ID robot-001-authn-ID.pem robot-001-authn-ID.key \
  --ca ~/.step/certs/intermediate_ca.crt \
  --ca-key ~/.step/secrets/intermediate_ca_key \
  --no-password --insecure --not-after 2400h

# Get the thumbprint
step certificate fingerprint robot-001-authn-ID.pem
A-4. Registering the Client
- From the namespace left menu, choose "MQTT broker" → "Clients"
- Click "+ Client"
- Enter the following and click "Create"
| Field | Value |
|---|---|
| Client name | any (e.g., robot-001) |
| Client Authentication Name | the name used when generating the certificate (e.g., robot-001-authn-ID) |
| Client certificate authentication validation scheme | choose Thumbprint Match |
After selecting "Thumbprint Match," a Primary Thumbprint input field appears — enter the thumbprint value obtained in A-3.
A-5. Creating a Topic Space
- From the left menu, choose "MQTT broker" → "Topic spaces"
- Click "+ Topic space"
- Enter the following and click "Create"
- Name:
robot-topic-space - Topic template:
robot/001/pose(enter via "+ Add topic template")
- Name:
A-6. Configuring Permission Bindings
To allow two-way communication between the robot (publisher) and the Fabric EventStream (subscriber), create two bindings.
- From the left menu, choose "MQTT broker" → "Permission bindings"
- Using "+ Permission binding", create the following two entries
| Binding name | Client group | Topic space | Permission |
|---|---|---|---|
robot-publisher-binding |
$all |
robot-topic-space |
Publisher |
robot-subscriber-binding |
$all |
robot-topic-space |
Subscriber |
A-7. Connecting from the Bridge Script
python3 ros2_mqtt_bridge.py \
  --fabric-host my-robot-iotns.ts.eventgrid.azure.net \
  --username robot-001-authn-ID \
  --cert-file robot-001-authn-ID.pem \
  --key-file robot-001-authn-ID.key
A-8. Verification (Azure Portal Metrics)
While the bridge script is running, you can verify message send/receive in the Azure Portal.
- Azure Portal → the Event Grid namespace you created → left menu "Monitoring" → "Metrics"
- Click "+ Add metric" and add the following metrics to monitor
| Metric name | What it confirms |
|---|---|
MQTT: Connections |
Whether the bridge script is connected successfully |
MQTT: Successful Published Messages |
Whether Event Grid is receiving messages |
MQTT: Successful Delivered Messages |
Whether messages are being delivered to subscribers |
If these values increase while the script is running, the connection to Azure Event Grid and message transmission are working correctly.
Official documentation:
Security Considerations
When a robot connects to the cloud over the internet, be sure to apply the following security measures.
- Encryption in transit: Use MQTT over TLS (port 8883)
- Authentication: Authenticate devices with X.509 certificates or SAS tokens
- Network isolation: Protect the robot's network segment with a firewall
- Principle of least privilege: Grant the robot only send-only permissions
Official documentation:
Summary
This article walked through building the following system step by step:
| Step | Content | Technology |
|---|---|---|
| 1 | Prepare the Fabric workspace | Microsoft Fabric |
| 2 | Convert ROS2 to MQTT | ROS2 / paho-mqtt |
| 3 | Receive MQTT in the cloud | RTI EventStream |
| 4 | Real-time DB ingestion | Eventhouse / KQL |
| 5 | Data lake storage | OneLake / Lakehouse |
| 6 | Real-time visualization | RTI Real-Time Dashboard |
Microsoft Fabric handles data collection, ingestion, storage, and visualization on a single platform, which dramatically reduces the cost and operational burden of building a digital twin. For preparing an MQTT broker, also see the Azure Event Grid configuration steps in the appendix. Use this article as a reference to try it with your own robots and IoT devices.
Thank you for reading. We hope this article helps you get started with connecting ROS2 robots and IoT devices to the cloud. If you have questions or feedback, please leave a comment.
Appendix B: Sample Source Code
The full source for the scripts used in this article.
B-1. ros2mqttbridge.py
A bridge script that subscribes to the /robot/pose topic on a local MQTT broker and forwards messages to the MQTT endpoint of Microsoft Fabric (Azure Event Grid).
"""
ROS2 -> Microsoft Fabric MQTT bridge

Subscribes to JSON equivalent to geometry_msgs/PoseStamped on the /robot/pose
topic of a local MQTT broker and forwards it to the MQTT endpoint of
Microsoft Fabric (Azure Event Grid) as the robot/001/pose topic.

Usage:
    python ros2_mqtt_bridge.py --fabric-host <ENDPOINT> [options]

Prerequisites:
    - ros2_pose_simulator.py is running in another terminal
    - pip install paho-mqtt
"""

import argparse
import json
import ssl

import paho.mqtt.client as mqtt
from paho.mqtt.packettypes import PacketTypes
from paho.mqtt.properties import Properties

LOCAL_TOPIC = "/robot/pose"
FABRIC_TOPIC = "robot/001/pose"
ROBOT_ID = "robot_001"


def on_local_connect(client, userdata, flags, reason_code, properties=None):
    if reason_code == 0:
        client.subscribe(LOCAL_TOPIC, qos=0)
        print(f"[Local connect OK] subscribed to '{LOCAL_TOPIC}'")
    else:
        print(f"[Local connect failed] code: {reason_code}")


def make_on_message(fabric_client: mqtt.Client):
    """Return a callback that receives messages from local MQTT and forwards to Fabric."""

    def on_message(client, userdata, msg):
        try:
            data = json.loads(msg.payload.decode())
            pos = data["pose"]["position"]
            stamp = data["header"]["stamp"]

            payload = {
                "robot_id": ROBOT_ID,
                "timestamp": stamp["sec"],
                "x": pos["x"],
                "y": pos["y"],
                "z": pos["z"],
            }
            # Setting Content-Type to application/json makes Azure Event Grid
            # route the payload as `data` (JSON) instead of `data_base64`.
            pub_props = Properties(PacketTypes.PUBLISH)
            pub_props.ContentType = "application/json"
            fabric_client.publish(FABRIC_TOPIC, json.dumps(payload), qos=1, properties=pub_props)
            print(f"[Forward] x={pos['x']:>8.4f}  y={pos['y']:>8.4f}  -> {FABRIC_TOPIC}")
        except (KeyError, json.JSONDecodeError) as e:
            print(f"[Error] failed to parse payload: {e}")

    return on_message


def on_fabric_connect(client, userdata, flags, reason_code, properties=None):
    if reason_code == 0:
        print(f"[Fabric connect OK] {userdata['host']}:{userdata['port']}")
    else:
        print(f"[Fabric connect failed] code: {reason_code}")


def main():
    parser = argparse.ArgumentParser(description="ROS2 -> Fabric MQTT bridge")
    parser.add_argument("--local-host", default="localhost")
    parser.add_argument("--local-port", type=int, default=1883)
    parser.add_argument("--fabric-host", required=True,
                        help="FQDN of the Fabric/Event Grid MQTT endpoint")
    parser.add_argument("--fabric-port", type=int, default=8883)
    parser.add_argument("--username", default=None,
                        help="Client authentication name (registered in A-4)")
    parser.add_argument("--password", default=None)
    parser.add_argument("--cert-file", default=None,
                        help="Path to the client certificate file (.pem)")
    parser.add_argument("--key-file", default=None,
                        help="Path to the client private key file (.key)")
    parser.add_argument("--no-tls", action="store_true",
                        help="Disable TLS (for testing)")
    args = parser.parse_args()

    # Fabric client (publisher)
    fabric_client = mqtt.Client(
        mqtt.CallbackAPIVersion.VERSION2,
        client_id=f"{ROBOT_ID}_bridge",
        protocol=mqtt.MQTTv5,
        userdata={"host": args.fabric_host, "port": args.fabric_port},
    )
    fabric_client.on_connect = on_fabric_connect

    if args.username:
        fabric_client.username_pw_set(args.username, args.password)

    if not args.no_tls:
        fabric_client.tls_set(
            certfile=args.cert_file,
            keyfile=args.key_file,
            cert_reqs=ssl.CERT_REQUIRED,
            tls_version=ssl.PROTOCOL_TLS_CLIENT,
        )

    # SessionExpiryInterval=0: discard the session on disconnect and avoid quota usage
    connect_props = Properties(PacketTypes.CONNECT)
    connect_props.SessionExpiryInterval = 0

    fabric_client.connect(args.fabric_host, args.fabric_port, clean_start=True, properties=connect_props)
    fabric_client.loop_start()

    # Local client (subscriber)
    local_client = mqtt.Client(
        mqtt.CallbackAPIVersion.VERSION2,
        client_id="ros2_bridge_local",
    )
    local_client.on_connect = on_local_connect
    local_client.on_message = make_on_message(fabric_client)
    local_client.connect(args.local_host, args.local_port)

    print("[Running] press Ctrl+C to stop")
    try:
        local_client.loop_forever()
    except KeyboardInterrupt:
        print("\n[Stop] received Ctrl+C")
    finally:
        fabric_client.loop_stop()
        fabric_client.disconnect()
        local_client.disconnect()


if __name__ == "__main__":
    main()
B-2. ros2posesimulator.py
A simulator that, in place of an actual ROS2 robot, publishes positions along a circular path centered on downtown Osaka to a local MQTT broker.
"""
ROS2 pose data generator (simulator)

Generates JSON payloads equivalent to geometry_msgs/PoseStamped and publishes
them to a local MQTT broker, emulating a ROS2 publisher. Use together with
ros2_mqtt_bridge.py.

Coordinate system:
    x = longitude, y = latitude
    Circular path of roughly 500 m radius centered on downtown Osaka
    (latitude 34.6937, longitude 135.5023)

Usage:
    python ros2_pose_simulator.py [options]

Prerequisites:
    - A local MQTT broker (e.g., Mosquitto) is running
      macOS: brew install mosquitto && brew services start mosquitto
      Ubuntu: sudo apt install mosquitto && sudo systemctl start mosquitto
    - pip install paho-mqtt
"""

import argparse
import json
import math
import time

import paho.mqtt.client as mqtt

LOCAL_TOPIC = "/robot/pose"
FRAME_ID = "map"

# Path parameters centered on downtown Osaka
CENTER_LAT = 34.6937   # latitude
CENTER_LON = 135.5023  # longitude
# Roughly 500 m radius (1 degree latitude ~= 111 km, so 0.005 deg ~= 556 m)
RADIUS_DEG = 0.005


def circular_path(step: int, total_steps: int = 360) -> tuple[float, float]:
    """Return (longitude, latitude) on a circular path centered on downtown Osaka."""
    angle = math.radians(step % total_steps)
    lon = CENTER_LON + RADIUS_DEG * math.cos(angle)
    lat = CENTER_LAT + RADIUS_DEG * math.sin(angle)
    return lon, lat


def build_pose_stamped(step: int) -> dict:
    """Build a JSON payload equivalent to geometry_msgs/PoseStamped.
    Store x = longitude and y = latitude.
    """
    now = time.time()
    lon, lat = circular_path(step)
    return {
        "header": {
            "stamp": {"sec": int(now), "nanosec": int((now % 1) * 1e9)},
            "frame_id": FRAME_ID,
        },
        "pose": {
            "position": {"x": round(lon, 6), "y": round(lat, 6), "z": 0.0},
            "orientation": {"x": 0.0, "y": 0.0, "z": 0.0, "w": 1.0},
        },
    }


def on_connect(client, userdata, flags, reason_code, properties=None):
    if reason_code == 0:
        print(f"[Connect OK] local broker {userdata['host']}:{userdata['port']}")
    else:
        print(f"[Connect failed] code: {reason_code}")


def main():
    parser = argparse.ArgumentParser(description="ROS2 pose simulator")
    parser.add_argument("--host", default="localhost")
    parser.add_argument("--port", type=int, default=1883)
    parser.add_argument("--interval", type=float, default=1.0,
                        help="Publish interval (seconds, default: 1.0)")
    parser.add_argument("--count", type=int, default=0,
                        help="Number of messages to send (0 = unlimited)")
    args = parser.parse_args()

    client = mqtt.Client(
        mqtt.CallbackAPIVersion.VERSION2,
        client_id="ros2_simulator",
        userdata={"host": args.host, "port": args.port},
    )
    client.on_connect = on_connect
    client.connect(args.host, args.port)
    client.loop_start()

    print(f"[Start] publishing to topic '{LOCAL_TOPIC}'... (Ctrl+C to stop)")
    step = 0
    try:
        while True:
            payload = build_pose_stamped(step)
            client.publish(LOCAL_TOPIC, json.dumps(payload), qos=0)
            pos = payload["pose"]["position"]
            print(f"[Send] step={step:>4d}  lon={pos['x']:>10.6f}  lat={pos['y']:>10.6f}")
            step += 1
            if args.count > 0 and step >= args.count:
                break
            time.sleep(args.interval)
    except KeyboardInterrupt:
        print("\n[Stop] received Ctrl+C")
    finally:
        client.loop_stop()
        client.disconnect()


if __name__ == "__main__":
    main()
Note: This article is based on information current as of 2025. Microsoft Fabric is continuously evolving, so please refer to the Microsoft Fabric official documentation for the latest details. Some features are in preview, and configuration items, behavior, and on-screen labels may change before general availability (GA).
Also note that at the time of writing, perhaps due to the preview status, the portal often mixed English and Japanese labels, which sometimes made the steps hard to follow. We hope localization and label consistency improve as the product approaches GA.